FAQs
Setting up your account
VoIP (also known as SIP) allows you to carry a call over the internet connection of your VoIP device, which can be an app on your mobile/tablet/PC/laptop, or using an existing VoIP handset or ATA box.
For example, many users install a free VoIP app and use this on a mobile device. This acts like the normal phone dialler, but works over your devices internet connection or wifi.
Using this app on your mobile you can receive calls FREE as well as make outbound calls that display your virtual phone number as the caller ID, and any calls made come out of your credit balance on your account with us. Your mobile network operator (EE, o2, Voda etc) will not see the call so cannot bill this.
With VoIP you can do the following-
– Receive calls FREE* (anywhere you have an internet connection)
– Make outbound calls
– Display your virtual number as your outbound caller ID
– Add more VoIP users at £4 per month includes a bundle of 100 free minutes for outbound calls
– Distribute inbound calls across VoIP users
– Call other VoIP users free
*if you are using a virtual 080 freephone number then calls will cost 7.5p per minute
The unlimited bundle is activated against a VoIP user, and allows that user unlimited outbound calls to standard UK landlines and mobiles plus many international destinations. This bundle costs £7 per month on top of the £4 per month cost of the VoIP user.
Unlimited outbound calling is added via the customer portal once you have activated and verified your account.
Terms and Conditions for the Unlimited Bundle can be found within the footer of our website.
Please note that not only do we NOT support the use of our systems and telephone numbers for registration services, we actively block them as we find them.
If you need a telephone number to register for a service like Ebay or Amazon then please look elsewhere, the inbound calls from these services will fail with us.
When we find new registration services we block the inbound calls from these across our network, so no one using our services will be able to receive calls from the registration service.
This is done to keep our costs low for our genuine customers that just want a great VoIP or virtual number service at a very low cost, by removing customers that would otherwise waste time and numbers.
Each voip user will receive 100 minutes per month to call UK landlines, mobiles and also some international destinations. You can check what is covered using the rate checker on the pricing page of the website.
You can add an unlimited outbound call bundle to any VoIP user for just £7 per month and will cover UK landline, mobiles and some international destinations.
When you activate your Love VoIP account, we will give you a period to test our services for free.
The free trial is to allow you to test out the service, as a proof of concept, so that you know that the VoIP system is working and will allow you to experience the service for real.
Please note, our trial accounts are for inbound calling only
If you have attempted to register for a free account with us and have had a registration error then this may be because of one of the following reasons-
1 – Sometimes our systems receive such high volumes of registrations that they become overloaded, so it is worth trying again in a couple of minutes to see if the same issue occurs.
2 – Temporary/ghost email address – if you are registering using a temporary/ghost email address service then these are banned and we automatically reject these submissions.
3 – You already have an account – you can only register an email address against one account, so if you try and use the same email address more than once then this will be rejected – if you wish to close the original account in order to re-use the email address on a new account then simply click on SUPPORT and request that the account is shredded first.
If you are still having issues with account registration then please contact us using the CHAT facility on our website or click on SUPPORT and select to create a new account, and we will process this manually for you.
Using VoIP to answer or make outbound calls is less complicated to set up as you may think. Lots of users just use their existing mobile phone as a VoIP extension – this is set up via mobile app. Once the app is installed, setup of the VoIP user is automatic by scanning a QR code – it’s very simple.
You can also make use of existing hardware by turning your PC / Tablet or laptop into a voip extension by using an app – this can then be used alongside a headset with microphone to make and receive calls.
You can also use the SIP registration details to reprogram any existing or new VoIP phones that you have. As long as the hardware is SIP compatible then it can be used on our network.
You can also set your number to be forwarded to an existing landline or mobile number, anywhere in the world. Call forwarding does not require any special equipment or software, you simply enter your telephone number where you will be answering the call and that’s it!
If you need any help setting up a device, please do get in touch or have a look at our help videos
Yes, you can move (port) any existing telephone number to Love VoIP. Porting a number will incur a fee. Please contact our customer care team for up to date pricing.
There are a few considerations to take on board prior to porting your telephone number. The first being that if you are porting away from a fixed line provider (eg BT) when your number is ported away from them they will cease the line. This will also cease any services you have attached to the line, so you need to make sure that nothing else is dependent on the line (like broadband, alarms etc).
Yes, you can have as many telephone numbers as you need. Your first standard number with us is free and any additional numbers are chargeable. Additional numbers are added via your customer portal after you have created your account
When you create a free account with us, our systems automatically send you a verification email.
To complete the registration process you need to click on the verification link that is sent within this email, otherwise your virtual number will not work.
If your account is not verified after 24 hours then our systems will automatically remove your account.
If for any reason you have not received the verification email then please firstly do the following-
1 – check your SPAM folder for this email.
2 – if this is still not found then please raise a support ticket by clicking on SUPPORT on our website and selecting the option to MANUALLY VERIFY AN ACCOUNT.
Load More
Setting up your VoIP Users
VoIP (also known as SIP) allows you to carry a call over the internet connection of your VoIP device, which can be an app on your mobile/tablet/PC/laptop, or using an existing VoIP handset or ATA box.
For example, many users install a free VoIP app and use this on a mobile device. This acts like the normal phone dialler, but works over your devices internet connection or wifi.
Using this app on your mobile you can receive calls FREE as well as make outbound calls that display your virtual phone number as the caller ID, and any calls made come out of your credit balance on your account with us. Your mobile network operator (EE, o2, Voda etc) will not see the call so cannot bill this.
With VoIP you can do the following-
– Receive calls FREE* (anywhere you have an internet connection)
– Make outbound calls
– Display your virtual number as your outbound caller ID
– Add more VoIP users at £4 per month includes a bundle of 100 free minutes for outbound calls
– Distribute inbound calls across VoIP users
– Call other VoIP users free
*if you are using a virtual 080 freephone number then calls will cost 7.5p per minute
Using VoIP/SIP over mobile data is normally the simplest method of connecting to our network, however if you are using wifi and get connection issues or registration problems then please follow this guide to help you set up your wifi router to work with VoIP/SIP. Please note that there are thousands of different routers, all with different ways of setting things up and describing settings, so we have been general with descriptions here in order to try and accommodate this.
If you are using a wifi connection and find that the VoIP app does not register then this is normally due to the wifi router either blocking or misrouting your connection.
To remedy this you will need to log in to the router and try the following-
Overview
1 – give the handset a static IP on the network, so that it can be easily found and handled correctly
2 – set QOS traffic priority
3 – forward port 5060 traffic directly to the handset
(the following are normally found under advanced settings)
Find the handset IP address on the network and set a static IP
1 – Firstly find the mobile phones IP address – this can be done by looking at the connected devices table and looking for your phones’ name and IP address. Otherwise view the wifi connection settings on your mobile device and you should see the IP address there.
1a – On the router look for IP SETTINGS, then STATIC IP , DHCP RESERVATION or MAC BINDING.
You will need to assign a DHCP reservation for the mobiles’ IP address, giving it a static IP address. This means that the handset always has the same IP address, so can be handled efficiently.
Set Traffic Priority
2 – If possible try and find QOS (Quality Of Service) on the router and assign the mobile priority 1.
Port Forwarding
If there is just the one VoIP device on the router then set up PORT FORWARDING. Port forwarding looks for the data entering the router on a particular port and routes it directly to a specified IP address and port number.
On this section set port 5060 to be forwarded to the handset IP address, specifying port 5060 on the internal side of the routing.
This will look something like this-
5060 – 192.168.1.10:5060
This forwards external requests to port 5060 and forwards them directly to port 5060 on the device IP address internally, making sure that the handset always sees the data it needs, and calls flow without interruption from the router.
This process will normally fix most issues relating to routers and networking, but if not then you can always talk to us on chat and we will be happy to help.
Some android phones are equipped with their own native SIP Dialler which you can use with our service.
Using the native softphone SIP dialler is actually far more efficient than using Grandstream Wave,Zoiper or any other app, and will help if you are experiencing issues with things like the keep alive settings on your device that can kill the softphone in the background and stop it registering.
The native SIP dialler is directly linked to your normal phone dialler, so there is no other app to use and acts just like the normal calling experience when making and receiving calls on your mobile device.
Setting up the native SIP dialler
Firstly, you will need to make sure that your device has the SIP account settings.
To find these you normally follow these steps, however be aware that these vary on different handset makes and models, so if you can’t find these quickly then google your handset make and model and “SIP account” for instructions on this.
1 – Go to the normal dialler as if you were going to make a call and click on the 3 menu dots.
2 – Select Call settings
3 – Select SIP accounts
4 – Click on + or add new
You will normally also have options to select in terms of using the SIP by default on every call and to receive calls via SIP, which you will want to select.
Getting your SIP credentials from our portal
To find the VoIP/SIP credentials on the portal please do the following-
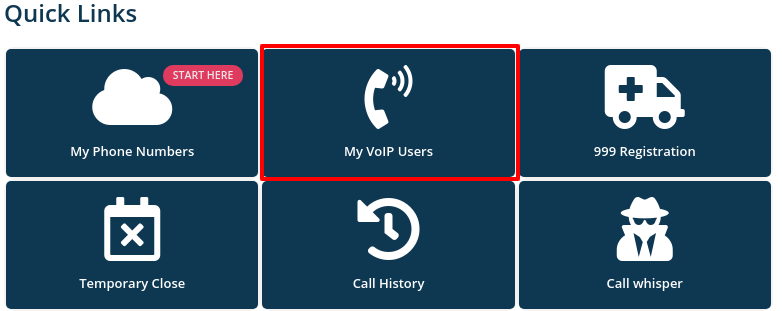
1 – From the dashboard click on “My VoIP users”
2 – Select the voip user you with to use and click on “edit”
3 – Then click on “Show QR code & set up your device”
4 –Click on “Regenerate password & Show QR code”
5 – Use the details on screen the manually set up your device
Once you have set up your account, you will be able to receive inbound calls from your voip users /extensions. Please note, our trial accounts are for inbound calling only
After the free trial period, each VoIP user will get a bundle of 100 free minutes to use to call UK landlines, mobiles and also some international destinations. If you have exhausted your free bundle, then calls made to a UK landline cost 1.5p per minute, and a UK mobile is 7p per minute. You can also upgrade your VoIP user to have an unlimited outbound call bundle at a cost of just £7 per month.
For full up-to-date pricing for international destinations, rates can be found on our pricing page.
When you dial out using VoIP/SIP, the call is currently formatted to originate from the area that your virtual number originates. This means that calls made outbound are formatted in the format of a UK local call.
An example of this is as follows-
UK (0044) 03333 444211
dials as 03333444211 or 00443333444211
South Africa (0027) – Mobile 0731234567 or +27731234567
dials as 0027731234567
You DO NOT use the + when calling out, instead use 00 then the country code, and also remove the first 0 if you have one.
If inbound calls to into your VoIP system are not being connected or if a message from us is played then please firstly try the following before submitting a ticket –
(1) Check your VoIP Users are active/registered VOIP/SIP USERS
If you are receiving calls to your VoIP users then please check the following-
– If using a mobile device, make sure that your VoIP app is displaying as REGISTERED. If not then switch it off and back on again.
- Ensure that your VoIP/SIP users are added into your call/ ring group for that number.
- If you are using other voip hardware then try rebooting the devices and also the routers and switches on the network.
– If you have an external destination phone number (landline or mobile number) in the call forwarding group, make sure you have credit on your account as a low balance will prevent the call from completing – If you don’t need the external divert number, just delete leaving only the VoIP users in the group
(2) LOW BALANCE
If you have an external member in your call group, such as a landline or mobile telephone number, you will need to keep your account in credit. This is because the system will see that the call may potentially be answered by the external group member and therefore a credit balance is required to be able to forward the call. In this case please simply top up your account and try again after a minute.
(3) Check your services
Under the service section of your portal please ensure that all your services are active on the account, you will need to check that the numbers, VoIP users and call / ring groups are all active. If anything needs renewing then simply top and and any overdue services will automatically renew.
- From the Dashboard select “My VoIP Users”
- Your VoIP user/s it will be listed in this section – Click the “Edit” button

- Then select “Show QR code & Set up your device”
- Then select the option “Regenerate password and show QR code”
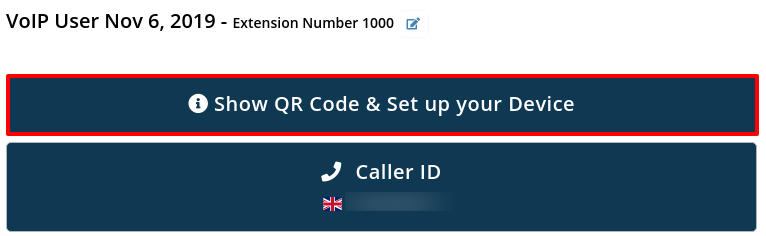
NON MOBILE USERS – If using this voip extension with a PC/Laptop softphone or if you are programming a VoIP phone then us the displayed information to manually set up your device –
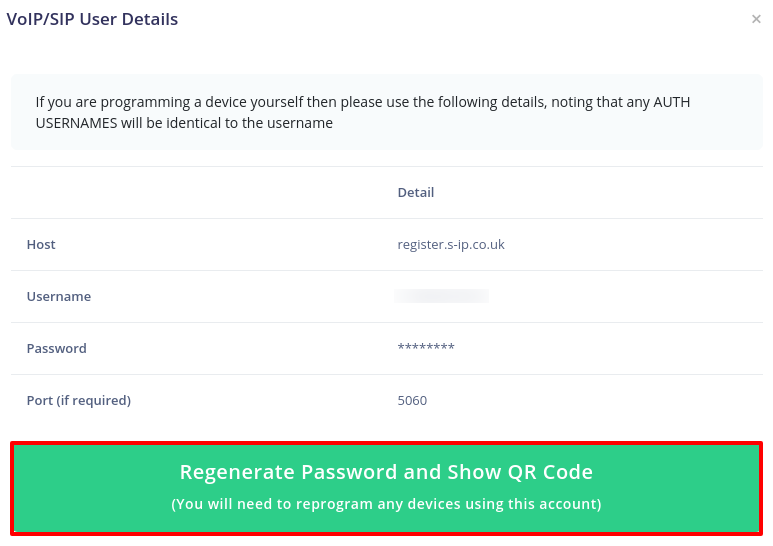
- When prompted, select OK to regenerate the details for this user
- The screen will then display the QR code to scan. By default this shows the QR code from Grandstream Wave. Download the app here, free https://play.google.com/store/apps/details?id=com.grandstream.wave&hl=en_GB
- Once you have installed the app, open it and click on “settings” & then “Add new account”
- If you are using a laptop/PC to display the QR code from the portal, then select the first option on Wave, so scan the QR code, and show your phone the QR code on the screen.
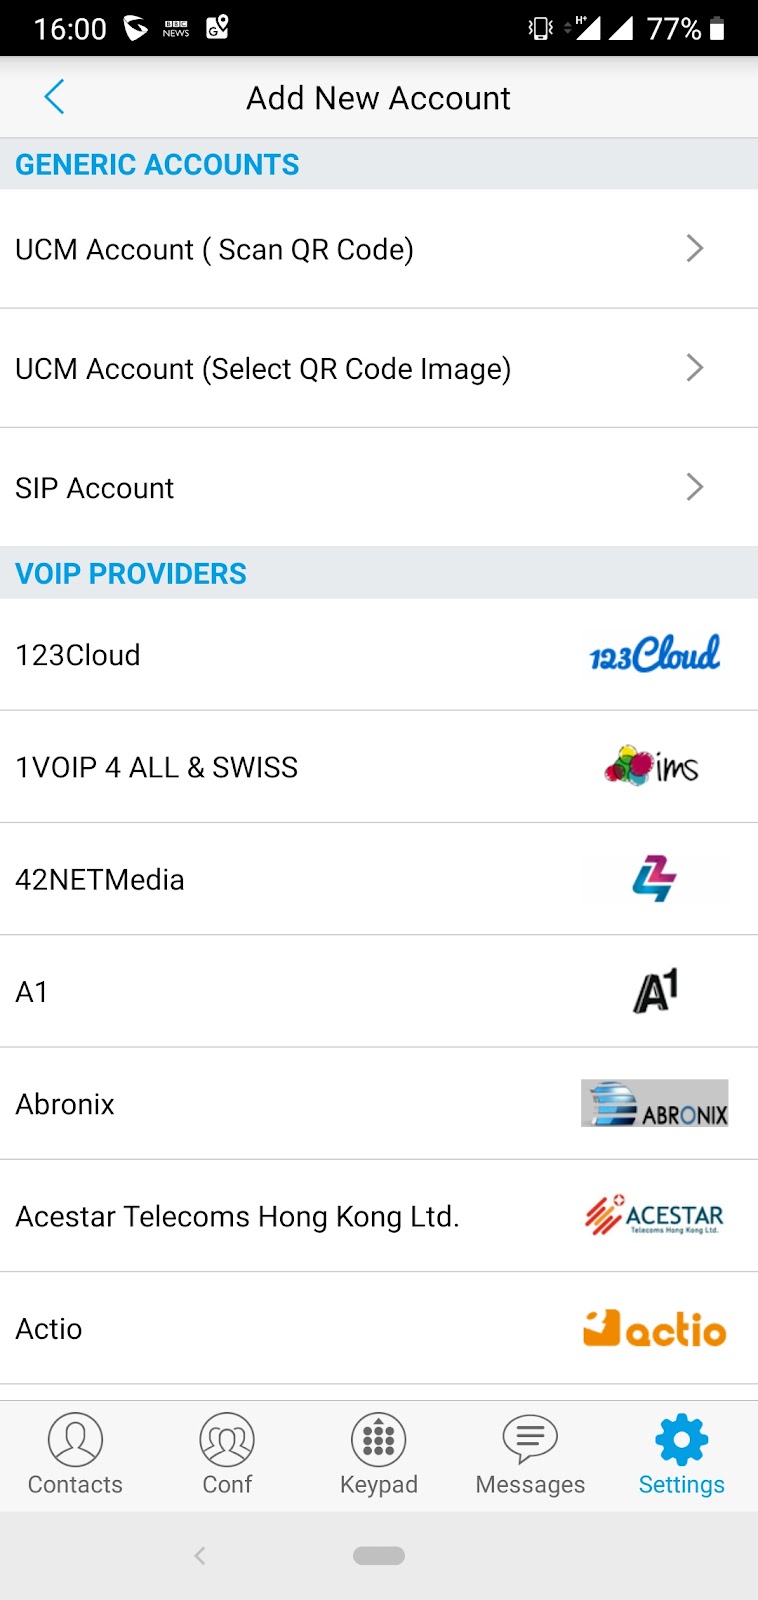
Please note – If you are using the mobile device to display the code, or are having issues scanning the QR code, then press and hold the image of the code and save it. You can then use the option to to use a scanned QR code.
- That’s it, you’re all ready to make and receive calls!
VoIP users can be grouped to receive calls, or you can create individual call groups allowing you to distribute incoming calls across multiple VoIP users.
You can also blend VoIP and external phone numbers into call groups, so the nominated VoIP users will ring alongside the mobile or landline numbers listed.
You can have as many VoIP users (or extensions) as you need. VoIP users can use a softphone app like Grandstream wave for mobile or zoiper for desktop softphones to turn the device into an extension to make and receive calls. Or if you already have a VOIP phone you can configure that to use on our network too.
VoIP users each get an individual extension number, and can call each other free just by calling their extension number. This allows you to call between devices like a laptop and a mobile phone free of charge.
VoIP users are added via your customer portal and are charged at £4 per month and include a bundle of 100 minutes of outbound calls.
Load More
Managing your account
Credit on your account will expire after a period of 360 days from the date of the purchase unless you add more credit in the meantime.
To avoid losing this credit balance simply top up before the credit expires and the entire balance will roll over for another 360 days.
We email a credit expiry reminder in advance of any credit expiring, giving you plenty of time to top up and keep your remaining balance.
If you are using the Auto Top Up facility then you can avoid credit expiring by manually setting the trigger limit below that of your current balance, which will force a credit top up.
If your credit balance does expire then any unused allowances will expire as specified.
Expired credit is non-refundable.
You can top up your account using any credit or debit card. You can also set up automatic top ups, which will add payment to your account if your account balance falls below a certain level. This is all set up online by yourself.
We have a section in the customer portal where you can change where your calls are sent to for a specific time period. This is great for things like bank holidays and Christmas closed periods.
To set your telephone number to closed, go to your customer portal and from the main dashboard click on “Temporary closed”

This will then take you to the temporary closed section, simply use the dropdown box to select the number to which to apply the closed rule.

Then click on “Add new temporary close rule” button

This will then show you the pop up which is where you set your closed period

Here you can see that you can use some preset dates that are commonly used, or to set your own simply create your own following the below instructions
- Give your rule a name, here we will create a bank holiday close

- The select the date of close, firstly use the tick boxes to select the month, and then enter the start date and time (date and time from which to close) and then the date and time to (when the system should reopen)
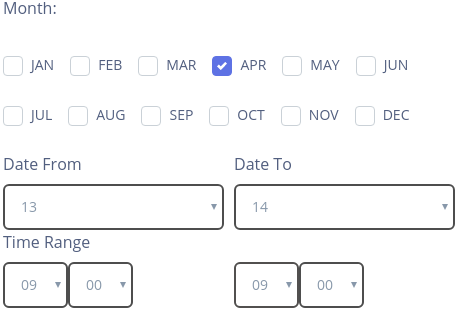
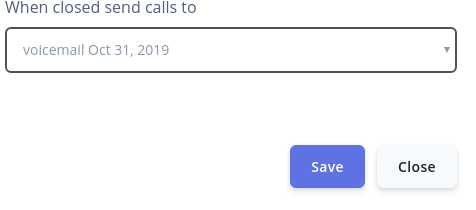
- Then you can use the dropdown section to tell us where to send the call when the system is closed and then just click save to create the rule
We comply with European directives on the payment for goods and services in terms of electronic transactions.
When you make a top up credit payment, you have to check a box to say that you understand that payments are not reversed, and no payments are refunded.
Account credit pays for services in advance. This is a prepaid service.
If you do not agree with this policy then please do not use our prepaid services.
If you have accidentally deleted a number from your account, or if your number was removed from your account due to non use. There are 2 things that you need to be aware of-
1 – Your first standard telephone number is free, additional numbers are chargeable
2 – our systems will look for accounts with no numbers and suspend the account as part of the clean up routine that allows people to easily cancel an account by deleting the number.
If you were paying for your number either as an additional number or as a chargeable memorable number then your number may still be held in reserve on your account. If so, you will see it listed under your services section on the portal. If it does show then simply making a top up to your account will automatically renew the number.
If your number has been completely removed from your account, then you can try to add the number back to your account yourself via the customer portal. Just click on “my numbers” then click on “add new number”. You can then use the number selector to find the number and add it back to your account.
If you can not see the number then you can get in touch with us and we can check if the number is still available and add it back to your account. There may be an admin charge to reinstate the number for you.
If your account has been marked as cancelled then you can reactivate this by simply topping up the account. This will then allow you to add new users, numbers and system features.
If there is no number on the account then you will need to immediately add a new number under the NUMBERS section, or the account will not be live.
If you have any problems reactivating an old account then simply use our CHAT facility on our website.
If you have multiple accounts and wish to migrate phone numbers from one account to another then there is a charge for the time that it takes us to do this manually.
£10 – move a single virtual number from one account to another
To initiate moving a number between accounts please raise a support ticket by clicking on SUPPORT and selecting the appropriate option.
Love VoIP has a usage policy in place, which helps us to maintain our low cost, high quality service delivery.
Firstly, you will need to test the service using the free test credit within the first 30 days by receiving a test call into your new VoIP Phone System, making sure that the call connects. If you do not make a test call to the phone number within this initial 30 day period then the number will be automatically removed from your account. If you haven’t topped up your account after 30 days of your trial period ending then we will also presume you no longer need the account and it will be cancelled.
Please note, our trial accounts are for inbound calling only.
Additionally, our usage policy means that if your account is not topped up within a 150-day period, then we will deem the account inactive and it will be cancelled.
More information on our policies can be found in our terms and conditions, which are available from the links at the footer of our website.
VoIP users can be grouped to receive calls, or you can create individual call groups allowing you to distribute incoming calls across multiple VoIP users.
You can also blend VoIP and external phone numbers into call groups, so the nominated VoIP users will ring alongside the mobile or landline numbers listed.
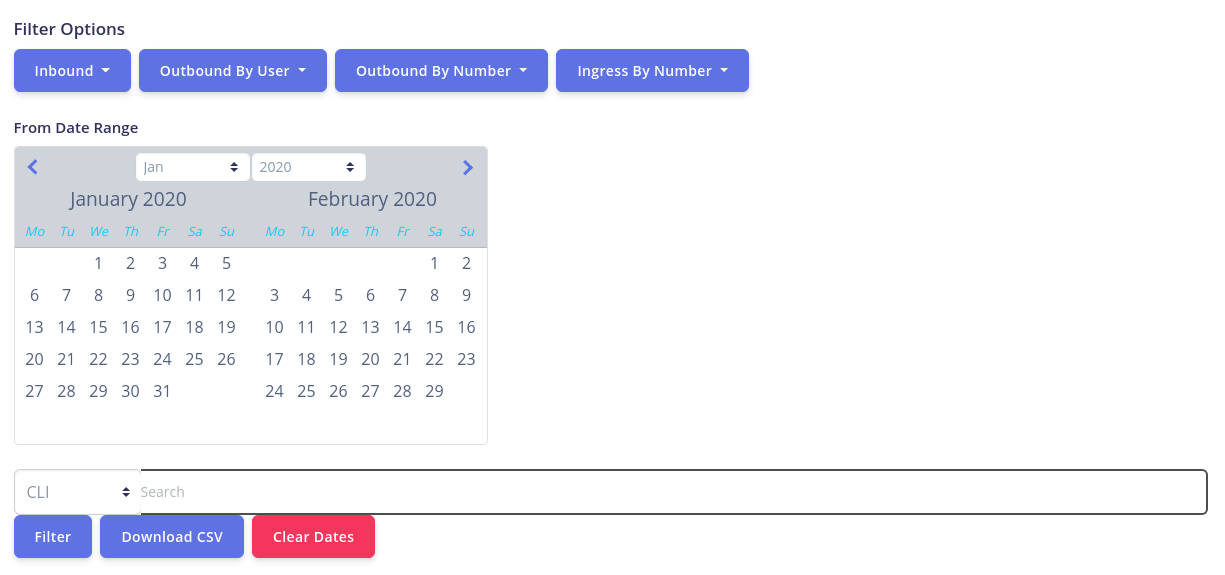
View and download your call data via your customer portal.
You can view your call data per telephone number or VoIP user for both inbound and outbound calls for the previous 6 months
To access the information go to your main Dashboard and use the quick link at the top of the page “Todays calls” or a little further down the page click on “call history”

This will then display your call statistics page, where you can filter inbound and outbound calls, then also further filter by inbound number or outbound voip user to see more detailed stats. You can also use our date filter to view call history for on or between specific dates. You can also use the search box to find specific data for a telephone number
Voicemail can be added to your system, whereby you can listen to, download and view messages via your customer portal. You can also set up an email address which can be used to forward voicemails to. These can then be listened to wherever you have access to your email.
To set up voicemail, log into your customer portal and from the dashboard click on “voicemail inboxes”

Then to add a new voicemail click on “add new voicemail box” and follow the on screen prompts

Once created it will take you to the voicemail set up page below
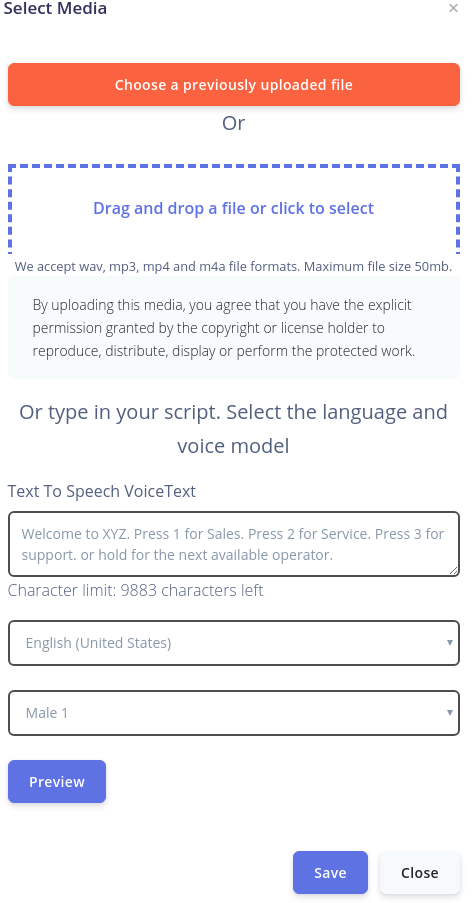
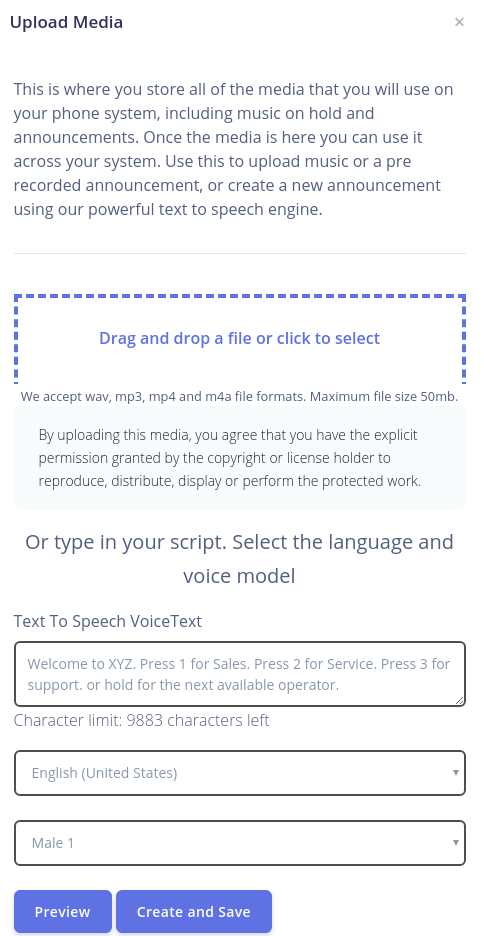
Firstly you can attach the media which you want to use eg “Thanks for calling Dave’s auto repairs, please leave a message after the tone and we will get back to you as soon as possible” To set this click on the first option “announcement”

This will then pop up the media pop up as below, simply use the dropdown box to select your media file, or click on “upload new file” to create a new media recording.

By clicking “upload new file” you will be presented with the media creation pop up, where you can upload any custom recordings that you already own, or you can use our Text to Speech service, to create your own custom greeting for your voicemail. Once you have uploaded or created this, just click “save”
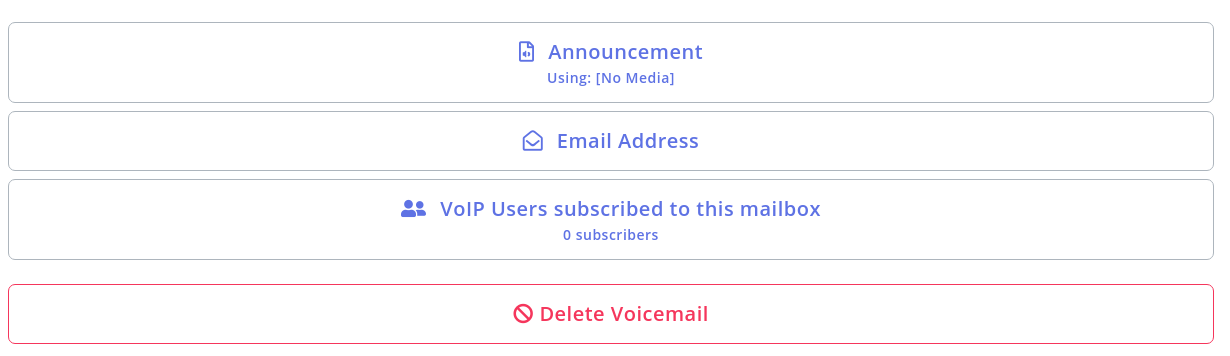
This will then take you back to the main voicemail editor screen, where you should see that your announcement has been attached
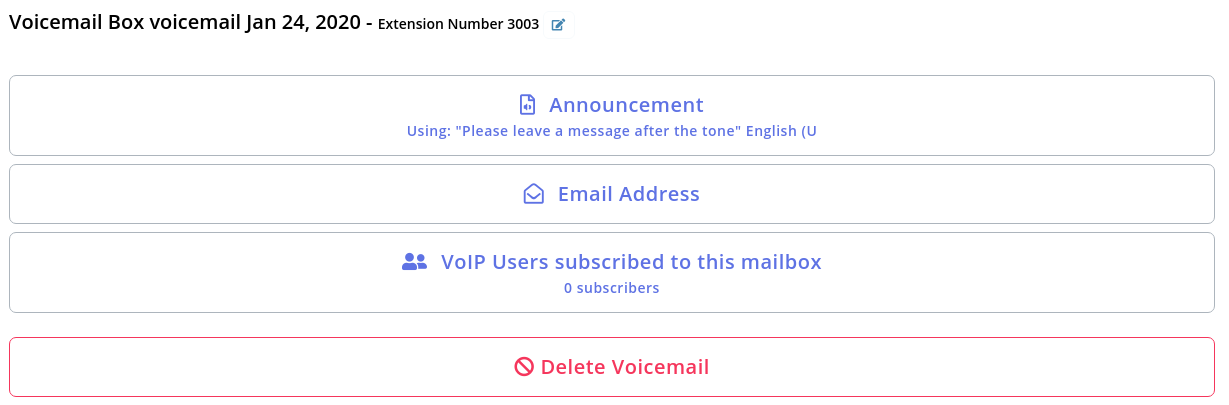
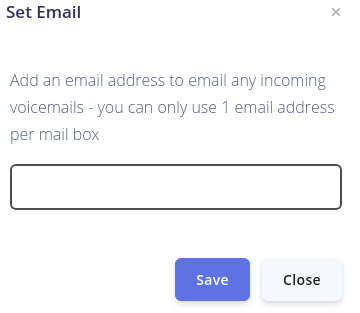
Next, you will need to assign an email address – this will be used to receive your voicemail to email alerts. Click on “email address”

Then simply enter the email address into the pop up box and click “save”
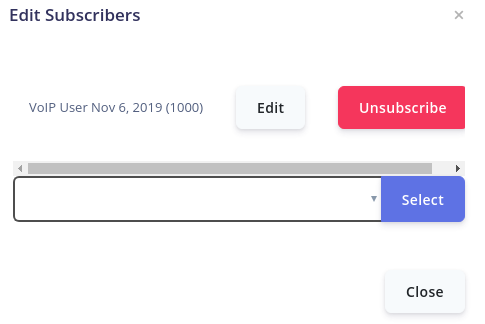
Next, you can add VoIP user subscribers. This will notify the voip users that use that mailbox that a message has been left. The VoIP users will get a notification on their device that a message has been received – the user/s can then dial 1571 to retrieve the message.

To add subscribers to the voicemail box, click on “voip users subscribed to mailbox” and use the pop up to add users. Use the dropbox box to select individual voip users
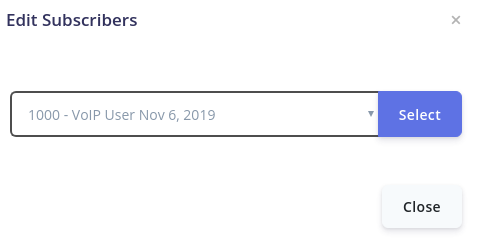
Once added, you can add more users or unsubscribe users at anytime too
Once happy with the settings, click close and that’s your voicemail all set up! Just make sure you then add the voicemail wherever you need it to handle your unanswered calls.
Adding an IVR menu is done via your customer portal.
From your portal dashboard click on “IVR Menus”

Then click “Add new menu”

This will then create a basic menu setup which you will need to edit
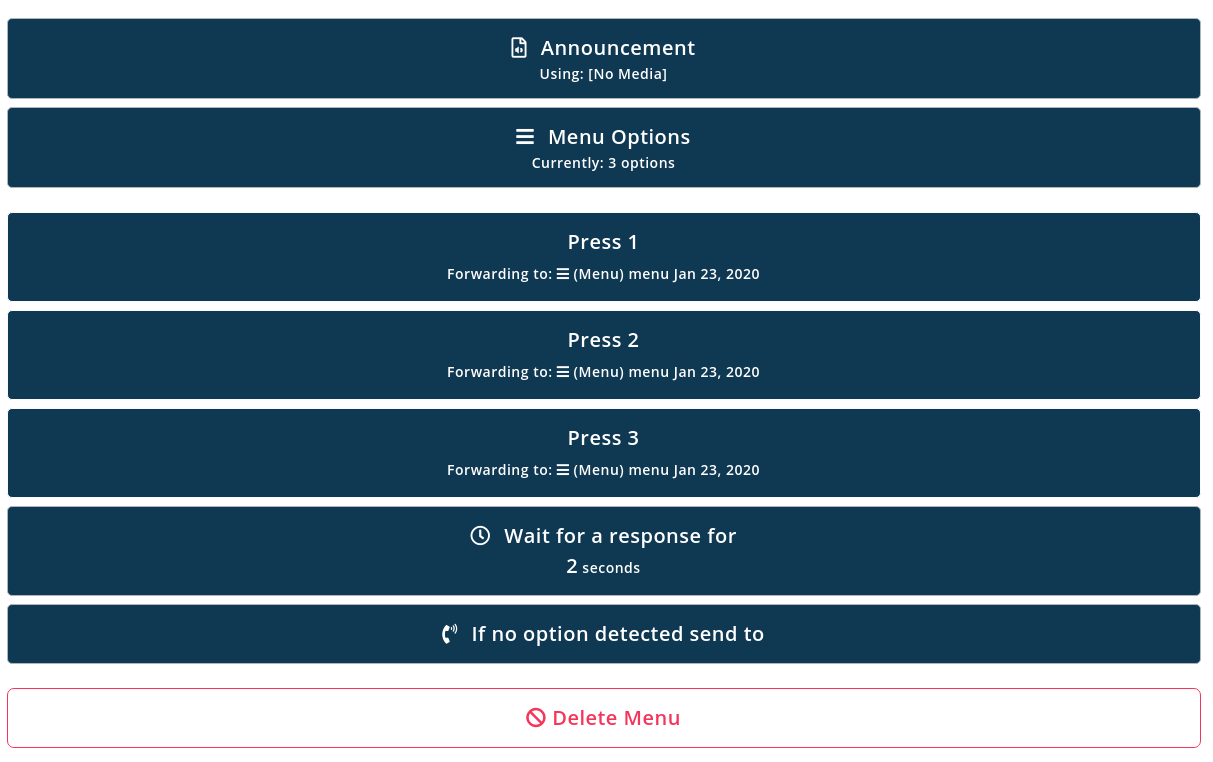
Firstly, you will need to add your media announcement (voice recording) to the menu, this is what will be played to your callers. To do this click on the top option “announcement”
Then you can use the drop down menu to attach your media (if you have already created your announcement) or click on “Create or upload new media”
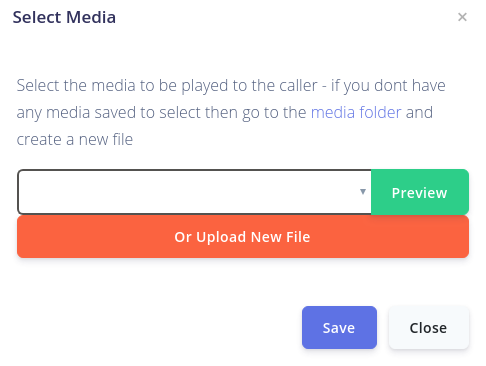
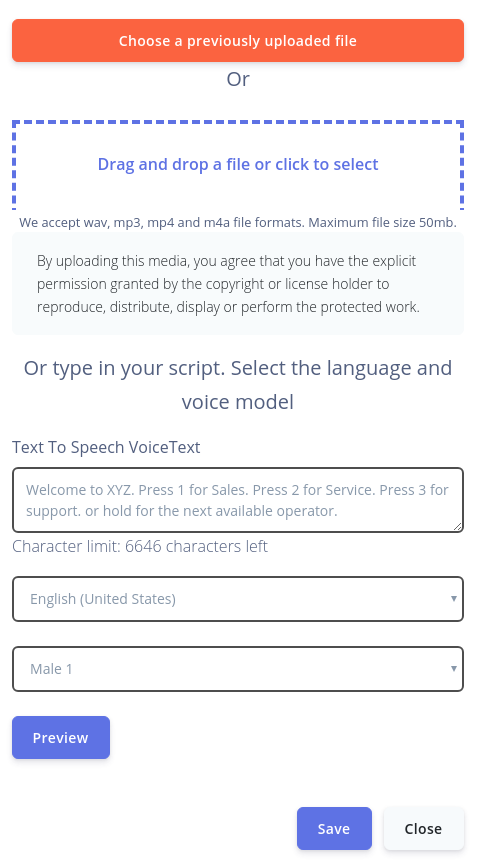
If you need to create new media then you can either upload a media file which you may have, or you can use our text to speech tool to easily create your welcome message. Once done, just click “Save”
Once you have added your media, you can then set your menu options. We have automatically given you 3 options, but if you need more then click on “menu options” and this will give you a dropdown for you to add more options
Once happy that you have the correct number of options you just need to set the destinations for each. Click on the menu option to edit each. Each option has to have a destination, so we automatically set the destination as the menu (so it loops back)
To change this click on “options” Here you will see all the different destinations that you can send the calls to. Just choose which option you want to use.
Here we will be sending calls to our Sales Group, so click on “call forwarding group” and Select the group you want to use
Continue with this process until all of your menu options are routed to their correct destinations. You can then check the remaining settings as you require for the response time and what to do if no option is pressed.
Once you have created your menu, if you want to start using it straight away, just make sure that your number is now forwarded directly into the menu. So, from your dashboard go to “My Numbers”. Click on “manage my number”, then “click here to change where calls are sent to” and from the options box choose “menu” and select your menu.
Each voip user will receive 100 minutes per month to call UK landlines, mobiles and also some international destinations. You can check what is covered using the rate checker on the pricing page of the website.
You can add an unlimited outbound call bundle to any VoIP user for just £7 per month and will cover UK landline, mobiles and some international destinations.
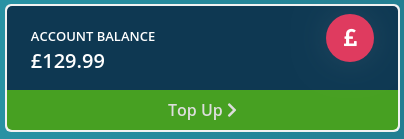
Topping up your account is very simple. Simply log into your customer portal and from the Dashboard, click on “top up” this can be found at the very top of the page where your balance is displayed and also further down in the financial section. Click either of these to reach the top up screens.

You will then arrive at the top up screen, firstly choose the amount you wish to top up by
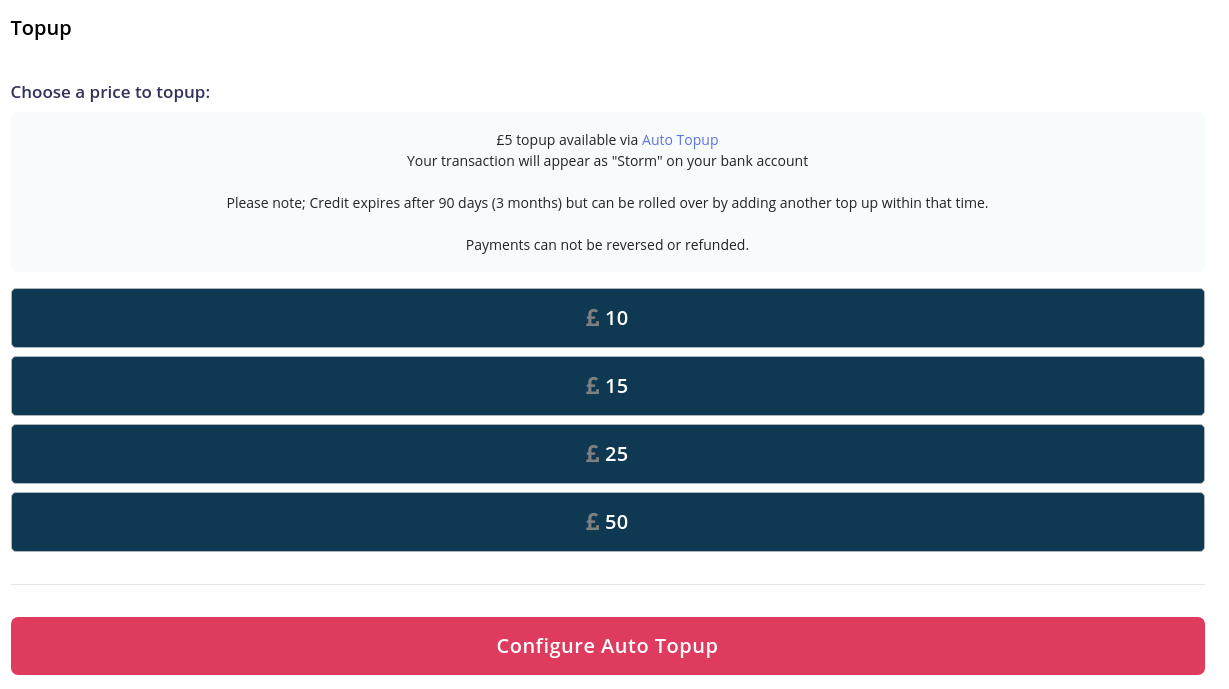
Then, simply enter your card details that you want to use for payment and then click on “make payment”

This may then take you through the card verification for your added protection – just follow the onscreen prompts until you reach the payment success page

Once you have signed up for your free trial you will have access to our online customer portal. The portal controls all aspects of your VoIP system, including call routing, creating your media, adding your services, billing, call statistics much more..
Creating an announcement is really simple, but can make a huge difference to your caller experience.
To create an announcement, log into your customer portal and from your dashboard
Click on “intro announcements”

Then if you haven’t already got one, click to purchase the new announcement & follow the onscreen prompts

Once you have added your announcements to the account you will be taken to the set up screen below
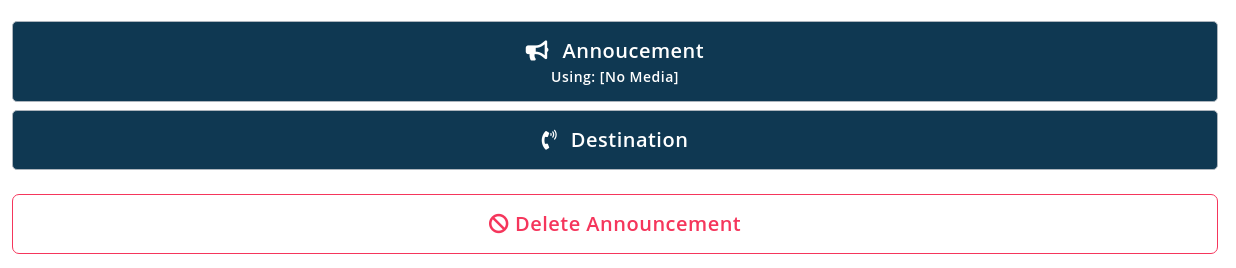
Now, you will need to attach your media file, to do this click on the top option “announcement” which will take you to the “select media” pop up below
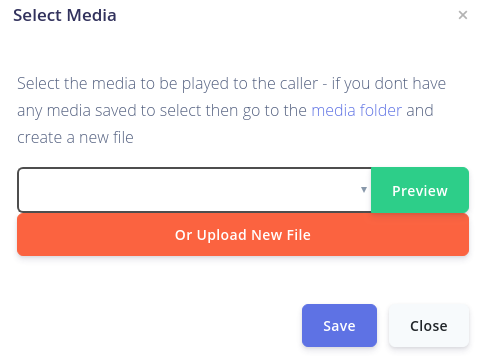
If you already have created your media file, simply use the dropdown box to select and use the file. If you haven’t created one yet then click on “Upload new file”. This will take you to the “create media pop up” where you can upload a media file, or you can create a personalised announcement using our simple to use Text to Speech service.
Once you are happy with the media file, click “save” and you will be taken back to the set up screen with your media file now attached

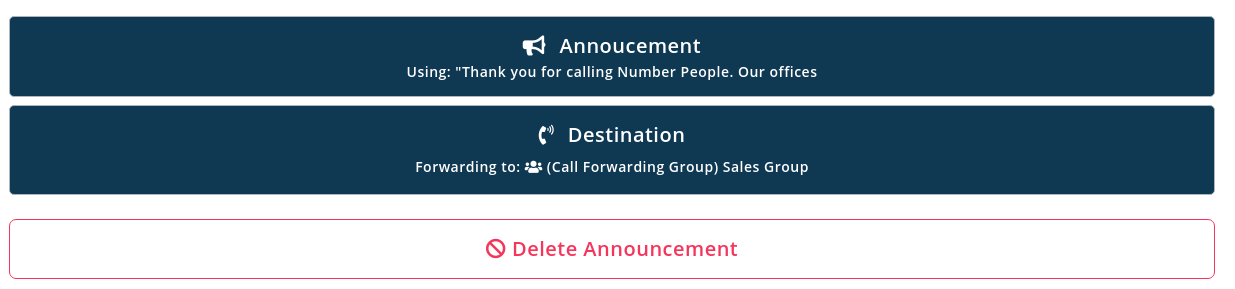
Next, you will need to set the destination for your announcement (where will the call go to after the announcement is played?) To set this, click on “destination”

This will pop up the below box which you use to set your destination
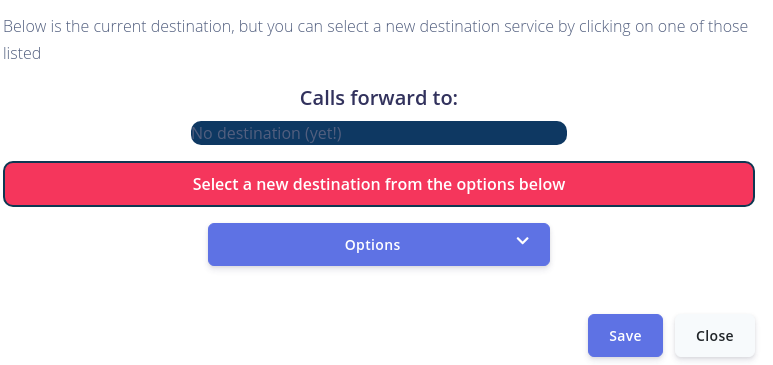
Click on “options” which will show you dropdown options where to can choose where to send calls to, they can go to a call group, a voicemail, a voip user, an ivr menu or even to another announcement – just choose the option you want

Once you have chosen your destination, you should see confirmation that it has been set, at which point you can close the pop and return to your announcement set up screen
If you are ready to use the announcement straight away, make sure that you set the announcement as the destination of your incoming calls.
If you need to know what services you have and when they are due to expire or renew then this can be seen on your customer portal. Once logged into your portal, from the dashboard click on “my services”. This will then display all of your services, their cost, when they were created and when they expire. As long as you have enough credit on your account, expired services will try to renew automatically.
If you have a service which you no longer require please ensure you delete it so it doesn’t automatically renew.
If a service has failed to renew due to insufficient funds, after funds have been added then the service should automatically renew.
- From the main dashboard screen click on “Call groups”

- Then select the group you wish to change and click the purple “edit” button in the top right corner
- Next, select the top option “Forward calls to”
- You will then be presented with a top up – this is where you can add divert numbers (landline or mobile numbers) or add voip users into your call group
- Simply enter the number you wish to forward to (including country code) into the divert numbers section, or click on the “voip users” tab to include voip users into the call group. Once you’re happy with your setting, simply close the pop up.
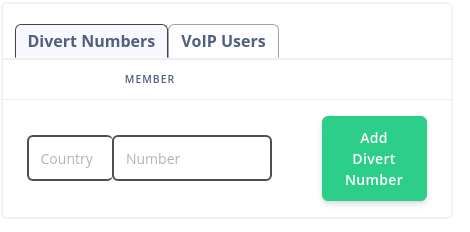
- That’s it you have edited your members of your call group
To maintain our very low costs we need to automate our processes, including payments.
We accept credit or debit card payments via our 3rd party card providers. This is a self service system that links to our portal and allows you to top up whenever you need more account credit.
The criteria for card payments is as follows-
Cards payment requirements
1 – registered 3D secure
2 – accept liability shifting from the donor bank
Card rejection reasons
1 – insufficient funds
2 – “Do Not Honor” rejection from the bank
3 – non 3D secured card
4 – non liability shifted rejection from the bank
5 – hard decline from the bank such as fraud
Card rejection actions
Anti-fraud checks
If our automated system find actions like multiple failed payment attempts, fraud rejections or similar, then the systems will automatically do the following –
1 – suspend access to your account
2 – depending on the rejection, the systems may cancel your number pending investigation
3 – email you on your registered email address to ask you to contact customer services to discuss your account
In this case just follow the instructions and customer services will investigate your account.
We offer a self service platform whereby we don’t tie you into any long term contracts for any number, bundle or feature. Due to this you can add on or cancel items as and when necessary.
If you have an item on your account you wish to cancel then please do this via your customer portal
- Cancelling a number
- Go to Dashboard and select “my numbers”
- Find the number you wish to cancel and click “manage my number”
- Select the last option “Delete number” & Click “OK” to confirm
- Cancelling a bundle or any other service
- Go to Dashboard and select “My Services”
- You will then be presented with all of your services on the account
- Find the service you wish to cancel and select “Delete” Click “OK” to confirm
Yes, you can forward calls to multiple destinations. The destinations can be VoIP users in or outside of the UK, or external divert members eg a landline or mobile number, or combinations of both. This is really handy if you have a team of people who can take a call regardless of their location.
If you are expecting to be able to forward calls to lots of destinations, you may want to upgrade your channel limits to ensure all of your forwarding destinations are rung. For more information about channels, see our “Call Channels” FAQ
Call channels are like virtual phone lines, each call either received inbound or used for an outbound call uses call channels.
Sending a call to a VoIP user does not use any channels, although, making an outbound call via a VoIP user uses just 1 channel.
If you are using your Love VoIP to forward calls to an external number (eg landline or mobile number), then this actually uses 2 channels. The first channel is used by the number being called and then the second channel is used to forward the call to your number.
With this in mind, when we create your account we give you 5 call channels free allowing you enough “lines” for you to receive and make calls without any issues. We find that for most customers this free call channel allowance works perfectly for them, but if you are expecting to make lots of outbound calls at once, or if you have a few external members you forward calls to, then you may want to consider adding additional channels.
If you ever exceed your free channel allowance then we will email you to let you know.
You can purchase more channels from the portal to increase your call capacity. Channels are purchased on a 30 day cycle, so you can add or reduce these as necessary.
Auto top up is a great way of managing the balance automatically on your account. Our auto top up service works by topping up your account when your balance falls below a set level. You can pre-configure your auto top up settings yourself and top up from as little as £5.
How to set it up
- From the Dashboard click on “Auto Top Up”

- Click on Enable Auto Topup

- Then set your top up levels, here you firstly set your “trigger amount” and then set the amount to top up.
E.g In the image below we have set it so that if balance falls below £3, then top up by £5
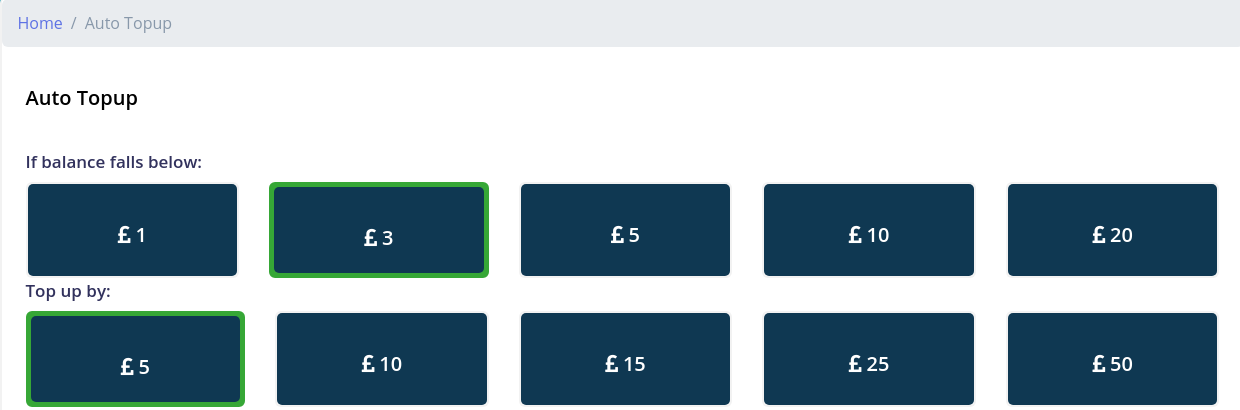
- Then just add your card details which will be used for the top ups & Save as default
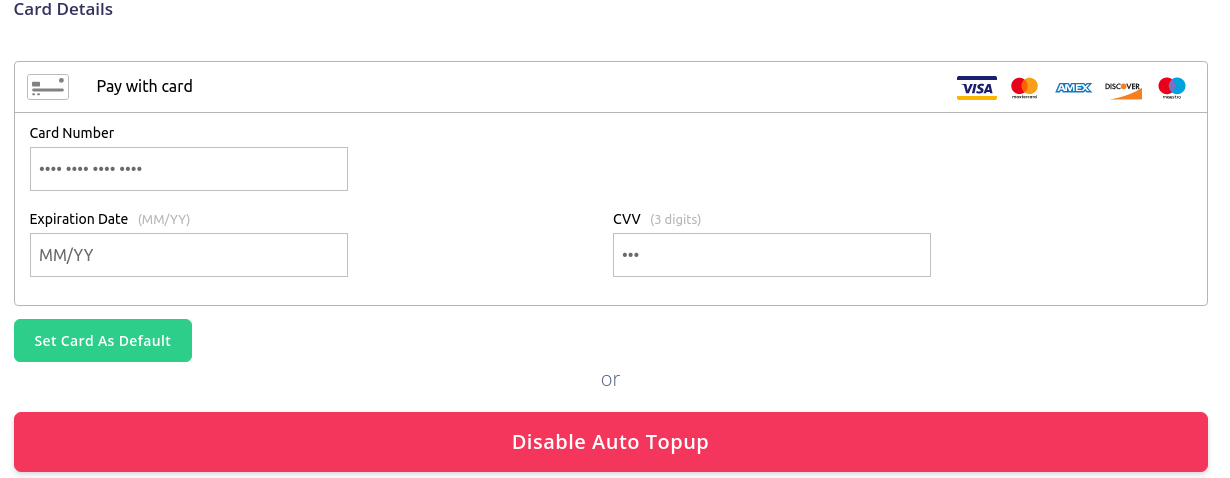
- You should then see that those settings have been saved. You may notice that the auto top up facility can sometimes take several minutes to top up your account, so don’t worry if this doesn’t happen straight away
Please note, if for any reason your card payment declined, then we will automatically remove the payment method. This is to avoid repeated declined transactions. If your card does decline then please contact your card provider before adding the same payment method, or just add a new card
You can have as many VoIP users (or extensions) as you need. VoIP users can use a softphone app like Grandstream wave for mobile or zoiper for desktop softphones to turn the device into an extension to make and receive calls. Or if you already have a VOIP phone you can configure that to use on our network too.
VoIP users each get an individual extension number, and can call each other free just by calling their extension number. This allows you to call between devices like a laptop and a mobile phone free of charge.
VoIP users are added via your customer portal and are charged at £4 per month and include a bundle of 100 minutes of outbound calls.
Load More
Using Love VoIP
Credit on your account will expire after a period of 360 days from the date of the purchase unless you add more credit in the meantime.
To avoid losing this credit balance simply top up before the credit expires and the entire balance will roll over for another 360 days.
We email a credit expiry reminder in advance of any credit expiring, giving you plenty of time to top up and keep your remaining balance.
If you are using the Auto Top Up facility then you can avoid credit expiring by manually setting the trigger limit below that of your current balance, which will force a credit top up.
If your credit balance does expire then any unused allowances will expire as specified.
Expired credit is non-refundable.
You can top up your account using any credit or debit card. You can also set up automatic top ups, which will add payment to your account if your account balance falls below a certain level. This is all set up online by yourself.
VoIP (also known as SIP) allows you to carry a call over the internet connection of your VoIP device, which can be an app on your mobile/tablet/PC/laptop, or using an existing VoIP handset or ATA box.
For example, many users install a free VoIP app and use this on a mobile device. This acts like the normal phone dialler, but works over your devices internet connection or wifi.
Using this app on your mobile you can receive calls FREE as well as make outbound calls that display your virtual phone number as the caller ID, and any calls made come out of your credit balance on your account with us. Your mobile network operator (EE, o2, Voda etc) will not see the call so cannot bill this.
With VoIP you can do the following-
– Receive calls FREE* (anywhere you have an internet connection)
– Make outbound calls
– Display your virtual number as your outbound caller ID
– Add more VoIP users at £4 per month includes a bundle of 100 free minutes for outbound calls
– Distribute inbound calls across VoIP users
– Call other VoIP users free
*if you are using a virtual 080 freephone number then calls will cost 7.5p per minute
The unlimited bundle is activated against a VoIP user, and allows that user unlimited outbound calls to standard UK landlines and mobiles plus many international destinations. This bundle costs £7 per month on top of the £4 per month cost of the VoIP user.
Unlimited outbound calling is added via the customer portal once you have activated and verified your account.
Terms and Conditions for the Unlimited Bundle can be found within the footer of our website.
An IVR menu is also sometimes called an Auto attendant. This is used as a call greeting which directs callers to choose a department or option to be put through to.
E.G “Welcome to Dave’s PC repairs. To enable us to handle your call efficiently please choose from one of the following options. Press 1 for new enquiries, press 2 to track your repair or press 3 of anything else”
They are a fantastic way to give your phone number a professional image and route your calls to people who can correctly deal with the call.
IVR menus can be used alongside groups, announcements and voicemails making them a valuable tool for handling incoming calls.
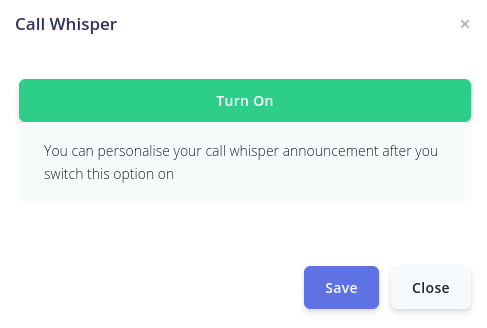
Call Whisper is a fantastic service which you can use to identify your incoming calls. Your call whisper can be completely customised and will play a short message to you (not the caller) prior to the call being connected. This is great if you have multiple phone numbers and you need to distinguish which phone number was rung or which menu option the caller selected.
Call whispers are added onto your call group. To add a call whisper follow the below instructions
- Firstly create your call whisper. From the Dashboard click on “My Media”

- Then click on “Create new media”
- Here you can upload your own custom media, or you can type in your script into the Text to speech boxes. You can also choose the language and voice model which you want – Click Preview to ensure you are happy and then click “Create & save”

- Now you have created your media you need to assign it to your call group. From the dashboard go to “Call forwarding Groups”

- Then find the group which you would like to attach the whisper to and click on the “Edit” button in the top right corner
- Next select the option “Call whisper”
- Click “Turn on” to activate the service
- Then use the dropdown box to add your media file & click “Save”
- Your call whisper will be activated and ready to use
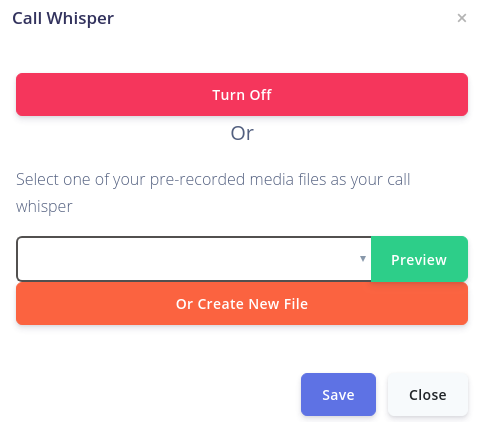
Please note – Call whispers are added onto call groups, if you are looking to use this feature to tell which number or menu option is used then each number or menu option will need to have their own call group. Call groups can be added or removed anytime.
A call / ring group is a place where you add your VoIP member/s, and or external numbers (eg a landline or mobile number) which you want to ring when an incoming call is placed.
All voip members or external members in a call group will ring at the same time and the first to answer the call will receive it.
You can add as many additional call groups as you need, they are free and included in your monthly costs. Using multiple groups, you can stagger the call flow.. Ie. Ring one group first, if no answer ring a different group.
Additional call groups are also used really well when using an IVR menu so that different phones are called depending on the option selected by the caller eg. Press 1 for sales rings only the Sales group
When you receive a call, the caller ID shown is the person calling you. If you have multiple phone numbers all forwarding to the users, you can create call groups specifically for the telephone number and use our free call whisper service which can play a custom message to you (not caller) to allow you to identify the call – see more on “Call whisper” FAQ
Each voip user will receive 100 free minutes every month to call UK landlines, mobiles and will also include some international destinations. Calls made over and above this free minute allowance will be chargeable. You can check specific rates using the rate checker on our pricing page on the website.
If you expect to make lots of outbound calls then you can add an unlimited outbound call bundle to any VoIP user at a cost of just £7 per month. This will cover calls to UK landlines and mobiles and also some international destinations.
We have a section in the customer portal where you can change where your calls are sent to for a specific time period. This is great for things like bank holidays and Christmas closed periods.
To set your telephone number to closed, go to your customer portal and from the main dashboard click on “Temporary closed”
This will then take you to the temporary closed section, simply use the dropdown box to select the number to which to apply the closed rule.
Then click on “Add new temporary close rule” button
This will then show you the pop up which is where you set your closed period
Here you can see that you can use some preset dates that are commonly used, or to set your own simply create your own following the below instructions
- Give your rule a name, here we will create a bank holiday close
- The select the date of close, firstly use the tick boxes to select the month, and then enter the start date and time (date and time from which to close) and then the date and time to (when the system should reopen)
- Then you can use the dropdown section to tell us where to send the call when the system is closed and then just click save to create the rule
If you are forwarding calls to a mobile number then you may experience ring delays. These are normally an issue related to the time that the mobile network takes to locate the handset across the mobile network via its local transmitter, and are part of the nature of mobile phone networks.
You will find that the time that it takes to connect to a mobile phone varies, depending on things like weather conditions, we infill this time with a “ring ring” tone, to avoid the gap that the caller would otherwise hear.
Whenever you answer calls via VoIP on your mobile device, you will notice that the connection/ ring time is much shorter.
We have automated systems that identify both registration and nuisance calls.
Registration calls are automated inbound calls generated by a user in order to attempt to register for a service like whatsapp, Ebay, Amazon, Stripe, Facebook and so on.
These services require a landline telephone number in order to register, and play back a code over the phone that the user can use to manually register their account.
When our systems identify inbound calls from registration numbers then these are automatically blocked, so these numbers can never call any of our customers again.
Nuisance calls are identified in a similar way, and when our systems identify these we automatically blacklist these in the same way, so that these numbers are unable to call our numbers.
If you wish to block a call yourself then you can access CALL BLOCKING features via the dashboard, which allows you to block entire number ranges, even countries on both inbound and outbound calls.
If you would like any further information on our call blocking then please contact our customer services team using our chat facility, or raise a support ticket via our website.
If you have accidentally deleted a number from your account, or if your number was removed from your account due to non use. There are 2 things that you need to be aware of-
1 – Your first standard telephone number is free, additional numbers are chargeable
2 – our systems will look for accounts with no numbers and suspend the account as part of the clean up routine that allows people to easily cancel an account by deleting the number.
If you were paying for your number either as an additional number or as a chargeable memorable number then your number may still be held in reserve on your account. If so, you will see it listed under your services section on the portal. If it does show then simply making a top up to your account will automatically renew the number.
If your number has been completely removed from your account, then you can try to add the number back to your account yourself via the customer portal. Just click on “my numbers” then click on “add new number”. You can then use the number selector to find the number and add it back to your account.
If you can not see the number then you can get in touch with us and we can check if the number is still available and add it back to your account. There may be an admin charge to reinstate the number for you.
If your account has been marked as cancelled then you can reactivate this by simply topping up the account. This will then allow you to add new users, numbers and system features.
If there is no number on the account then you will need to immediately add a new number under the NUMBERS section, or the account will not be live.
If you have any problems reactivating an old account then simply use our CHAT facility on our website.
Once you have set up your account, you will be able to receive inbound calls from your voip users /extensions. Please note, our trial accounts are for inbound calling only
After the free trial period, each VoIP user will get a bundle of 100 free minutes to use to call UK landlines, mobiles and also some international destinations. If you have exhausted your free bundle, then calls made to a UK landline cost 1.5p per minute, and a UK mobile is 7p per minute. You can also upgrade your VoIP user to have an unlimited outbound call bundle at a cost of just £7 per month.
For full up-to-date pricing for international destinations, rates can be found on our pricing page.
When you dial out using VoIP/SIP, the call is currently formatted to originate from the area that your virtual number originates. This means that calls made outbound are formatted in the format of a UK local call.
An example of this is as follows-
UK (0044) 03333 444211
dials as 03333444211 or 00443333444211
South Africa (0027) – Mobile 0731234567 or +27731234567
dials as 0027731234567
You DO NOT use the + when calling out, instead use 00 then the country code, and also remove the first 0 if you have one.
If inbound calls to into your VoIP system are not being connected or if a message from us is played then please firstly try the following before submitting a ticket –
(1) Check your VoIP Users are active/registered VOIP/SIP USERS
If you are receiving calls to your VoIP users then please check the following-
– If using a mobile device, make sure that your VoIP app is displaying as REGISTERED. If not then switch it off and back on again.
- Ensure that your VoIP/SIP users are added into your call/ ring group for that number.
- If you are using other voip hardware then try rebooting the devices and also the routers and switches on the network.
– If you have an external destination phone number (landline or mobile number) in the call forwarding group, make sure you have credit on your account as a low balance will prevent the call from completing – If you don’t need the external divert number, just delete leaving only the VoIP users in the group
(2) LOW BALANCE
If you have an external member in your call group, such as a landline or mobile telephone number, you will need to keep your account in credit. This is because the system will see that the call may potentially be answered by the external group member and therefore a credit balance is required to be able to forward the call. In this case please simply top up your account and try again after a minute.
(3) Check your services
Under the service section of your portal please ensure that all your services are active on the account, you will need to check that the numbers, VoIP users and call / ring groups are all active. If anything needs renewing then simply top and and any overdue services will automatically renew.
VoIP users can be grouped to receive calls, or you can create individual call groups allowing you to distribute incoming calls across multiple VoIP users.
You can also blend VoIP and external phone numbers into call groups, so the nominated VoIP users will ring alongside the mobile or landline numbers listed.
Want to move a number from Love VoIP to another network?
Sure, no problem – Yes, absolutely! You can take your number with you. We have porting agreements with all major UK telecommunications networks, ensuring a smooth transition.
Moving your number to a new provider (porting away) is handled by your new provider. They will contact us directly to arrange the port. This ensures a seamless and efficient transfer for you.
If you want multiple users to be able to answer a call, then you add the users into a call / ring group. Every member of that call / ring group will ring simultaneously on an incoming call. The first to answer the call will receive it.
If you prefer, you can create more call groups and allow more complex routing such as if one phone or group of phones doesn’t answer then it calls a different set of phone etc.
Multiple call groups are also used really well when using an IVR menu so that different phones are rang depending on the option selected by the caller eg. Press 1 for sales rings only the Sales group.
View and download your call data via your customer portal.
You can view your call data per telephone number or VoIP user for both inbound and outbound calls for the previous 6 months
To access the information go to your main Dashboard and use the quick link at the top of the page “Todays calls” or a little further down the page click on “call history”
This will then display your call statistics page, where you can filter inbound and outbound calls, then also further filter by inbound number or outbound voip user to see more detailed stats. You can also use our date filter to view call history for on or between specific dates. You can also use the search box to find specific data for a telephone number
Voicemail can be added to your system, whereby you can listen to, download and view messages via your customer portal. You can also set up an email address which can be used to forward voicemails to. These can then be listened to wherever you have access to your email.
To set up voicemail, log into your customer portal and from the dashboard click on “voicemail inboxes”
Then to add a new voicemail click on “add new voicemail box” and follow the on screen prompts
Once created it will take you to the voicemail set up page below
Firstly you can attach the media which you want to use eg “Thanks for calling Dave’s auto repairs, please leave a message after the tone and we will get back to you as soon as possible” To set this click on the first option “announcement”
This will then pop up the media pop up as below, simply use the dropdown box to select your media file, or click on “upload new file” to create a new media recording.
By clicking “upload new file” you will be presented with the media creation pop up, where you can upload any custom recordings that you already own, or you can use our Text to Speech service, to create your own custom greeting for your voicemail. Once you have uploaded or created this, just click “save”
This will then take you back to the main voicemail editor screen, where you should see that your announcement has been attached
Next, you will need to assign an email address – this will be used to receive your voicemail to email alerts. Click on “email address”
Then simply enter the email address into the pop up box and click “save”
Next, you can add VoIP user subscribers. This will notify the voip users that use that mailbox that a message has been left. The VoIP users will get a notification on their device that a message has been received – the user/s can then dial 1571 to retrieve the message.
To add subscribers to the voicemail box, click on “voip users subscribed to mailbox” and use the pop up to add users. Use the dropbox box to select individual voip users
Once added, you can add more users or unsubscribe users at anytime too
Once happy with the settings, click close and that’s your voicemail all set up! Just make sure you then add the voicemail wherever you need it to handle your unanswered calls.
Our rate checker allows you to easily check the cost of any call globally, so use this if you want to check the cost of calling outbound, or forwarding a call to a destination.
When entering a destination number into the rate checker, this will not only display the call cost to this destination, but if this destination is included in any of our call bundles.
To use our global rate checker simply visit our PRICING page.
Adding an IVR menu is done via your customer portal.
From your portal dashboard click on “IVR Menus”
Then click “Add new menu”
This will then create a basic menu setup which you will need to edit
Firstly, you will need to add your media announcement (voice recording) to the menu, this is what will be played to your callers. To do this click on the top option “announcement”
Then you can use the drop down menu to attach your media (if you have already created your announcement) or click on “Create or upload new media”
If you need to create new media then you can either upload a media file which you may have, or you can use our text to speech tool to easily create your welcome message. Once done, just click “Save”
Once you have added your media, you can then set your menu options. We have automatically given you 3 options, but if you need more then click on “menu options” and this will give you a dropdown for you to add more options
Once happy that you have the correct number of options you just need to set the destinations for each. Click on the menu option to edit each. Each option has to have a destination, so we automatically set the destination as the menu (so it loops back)
To change this click on “options” Here you will see all the different destinations that you can send the calls to. Just choose which option you want to use.
Here we will be sending calls to our Sales Group, so click on “call forwarding group” and Select the group you want to use
Continue with this process until all of your menu options are routed to their correct destinations. You can then check the remaining settings as you require for the response time and what to do if no option is pressed.
Once you have created your menu, if you want to start using it straight away, just make sure that your number is now forwarded directly into the menu. So, from your dashboard go to “My Numbers”. Click on “manage my number”, then “click here to change where calls are sent to” and from the options box choose “menu” and select your menu.
Each voip user will receive 100 minutes per month to call UK landlines, mobiles and also some international destinations. You can check what is covered using the rate checker on the pricing page of the website.
You can add an unlimited outbound call bundle to any VoIP user for just £7 per month and will cover UK landline, mobiles and some international destinations.
Love VoIP is operated by UK Telecoms company IP Voice Networks (IPVN), which is a UK based Ofcom Registered Telecoms Network.
IPVN owns and operates its own network, we don’t resell other people’s services. We own around 1 million Ofcom allocated virtual phone numbers for the UK market, but also have similar numbering arrangements in over 60 countries worldwide, and supply virtual telephone numbers and VoIP services to local markets across the globe.
IPVN has customers on every continent, and distributes telecoms services globally via different brands.
Dealing directly with a global telecoms network means that you avoid resellers and middle men, getting the products and services directly from the source.
We aim to provide the best possible products and services to the widest possible audience at the lowest possible price using our highly efficient, simple, self service offerings.
We hate to see you go, but if you wish to close your account then simply follow these steps.
1 – Log in to the portal
2 – Click on NUMBERS
3 – Click on your virtual number
4 – Click on CANCEL NUMBER
When an account has no numbers on it our systems will automatically set the status of the account to cancelled. This will set your account to cancelled, but allow you to log back in at a future date in order to retrieve invoices etc, or reactivate the account for future use.
If you wish to shred your account completely, or if you are having problems cancelling your account then please raise a support ticket and use the cancel account option.
Creating an announcement is really simple, but can make a huge difference to your caller experience.
To create an announcement, log into your customer portal and from your dashboard
Click on “intro announcements”
Then if you haven’t already got one, click to purchase the new announcement & follow the onscreen prompts
Once you have added your announcements to the account you will be taken to the set up screen below
Now, you will need to attach your media file, to do this click on the top option “announcement” which will take you to the “select media” pop up below
If you already have created your media file, simply use the dropdown box to select and use the file. If you haven’t created one yet then click on “Upload new file”. This will take you to the “create media pop up” where you can upload a media file, or you can create a personalised announcement using our simple to use Text to Speech service.
Once you are happy with the media file, click “save” and you will be taken back to the set up screen with your media file now attached
Next, you will need to set the destination for your announcement (where will the call go to after the announcement is played?) To set this, click on “destination”
This will pop up the below box which you use to set your destination
Click on “options” which will show you dropdown options where to can choose where to send calls to, they can go to a call group, a voicemail, a voip user, an ivr menu or even to another announcement – just choose the option you want
Once you have chosen your destination, you should see confirmation that it has been set, at which point you can close the pop and return to your announcement set up screen
If you are ready to use the announcement straight away, make sure that you set the announcement as the destination of your incoming calls.
- From the main dashboard screen click on “Call groups”
- Then select the group you wish to change and click the purple “edit” button in the top right corner
- Next, select the top option “Forward calls to”
- You will then be presented with a top up – this is where you can add divert numbers (landline or mobile numbers) or add voip users into your call group
- Simply enter the number you wish to forward to (including country code) into the divert numbers section, or click on the “voip users” tab to include voip users into the call group. Once you’re happy with your setting, simply close the pop up.
- That’s it you have edited your members of your call group
Yes, you can add voicemail to email to your account, this is included in your monthly costs. You can add as many voicemail boxes as you need. You will be notified of a new voicemail via email where you will also be sent a copy of the audio file to listen to the message.
You can create your own voicemail recording by uploading a media file, or you can create your own message using our free text to speech service on the customer portal.
All of your voicemails can be managed online via the portal with the facility to listen to, download and delete.
Using VoIP to answer or make outbound calls is less complicated to set up as you may think. Lots of users just use their existing mobile phone as a VoIP extension – this is set up via mobile app. Once the app is installed, setup of the VoIP user is automatic by scanning a QR code – it’s very simple.
You can also make use of existing hardware by turning your PC / Tablet or laptop into a voip extension by using an app – this can then be used alongside a headset with microphone to make and receive calls.
You can also use the SIP registration details to reprogram any existing or new VoIP phones that you have. As long as the hardware is SIP compatible then it can be used on our network.
You can also set your number to be forwarded to an existing landline or mobile number, anywhere in the world. Call forwarding does not require any special equipment or software, you simply enter your telephone number where you will be answering the call and that’s it!
If you need any help setting up a device, please do get in touch or have a look at our help videos
Yes, you can forward calls to multiple destinations. The destinations can be VoIP users in or outside of the UK, or external divert members eg a landline or mobile number, or combinations of both. This is really handy if you have a team of people who can take a call regardless of their location.
If you are expecting to be able to forward calls to lots of destinations, you may want to upgrade your channel limits to ensure all of your forwarding destinations are rung. For more information about channels, see our “Call Channels” FAQ
Yes, you can receive calls in most international destinations in the world.
VoIP does not tie you to a physical location, so as long as you can connect to the internet in your destination then you should have no problems in receiving and making calls, even when you are outside of the UK. Please note, some countries like UAE ban voip services, so you may not be able to use your VoIP extensions here.
You can also forward calls internationally, and some low cost international destinations (most landline numbers in mainland EU and the US) are also included in your free minute bundle. For international call forwarding and outbound call costs please see our pricing page and use the online rate checker.
Yes – you can have as many numbers as you like and you can set how each number is routed. You can route numbers to different groups of users or extensions, or have every user answering all your calls. How you route your calls is completely up to you. It is completely configurable from your online account portal and you can update this as often as you like.
Yes, you can have as many telephone numbers as you need. Your first standard number with us is free and any additional numbers are chargeable. Additional numbers are added via your customer portal after you have created your account
We automatically set your telephone numbers to block calls from withheld numbers. If you would prefer to accept these calls then you can change this setting via the customer portal
- From Dashboard go to “My Numbers”
- Find the number you wish to manage and click on “manage my number”
- Scroll down to “reject calls from withheld numbers” and Click on “OK” to disable this
Call channels are like virtual phone lines, each call either received inbound or used for an outbound call uses call channels.
Sending a call to a VoIP user does not use any channels, although, making an outbound call via a VoIP user uses just 1 channel.
If you are using your Love VoIP to forward calls to an external number (eg landline or mobile number), then this actually uses 2 channels. The first channel is used by the number being called and then the second channel is used to forward the call to your number.
With this in mind, when we create your account we give you 5 call channels free allowing you enough “lines” for you to receive and make calls without any issues. We find that for most customers this free call channel allowance works perfectly for them, but if you are expecting to make lots of outbound calls at once, or if you have a few external members you forward calls to, then you may want to consider adding additional channels.
If you ever exceed your free channel allowance then we will email you to let you know.
You can purchase more channels from the portal to increase your call capacity. Channels are purchased on a 30 day cycle, so you can add or reduce these as necessary.
We offer straightforward pricing, clearly display costs and don’t tie you into any long term contracts either.
Your first number with is is free, unless of course you choose a memorable number which starts from £5 per month. If you need any additional number these are charged at £1.50 per month.
You can add a new VoIP user to your account for just £4, this means that you receive calls for free and also have the ability to make outbound calls showing your Love VoIP phone number as your outbound caller ID. Each user has a bundle of 100 minutes to call outbound. Most people use this via a mobile app installed on their mobile phone, but it can also be used on a desktop device or with a SIP compatible physical phone.
You can also forward calls to landline and mobile numbers, practically anywhere in the world. Forwarding calls means that you do pay to receive the call as we have to forward the call out of our network. You can check the cost of forwarding a call via our rate checker on our website.
Your monthly costs also include a whole package of excellent phone system features, you can activate these anytime via our customer portal. We also have a small selection of advanced services such as larger storage space for call recording which do cost a little bit more – but you can see up to date costs for these on your customer portal and on our current pricing page of the website.
Please note: Calls made to an 0800 number will always incur an incoming call cost of 7.5p per minute plus any call forwarding charges if forwarding to an external group member.
You can have as many VoIP users (or extensions) as you need. VoIP users can use a softphone app like Grandstream wave for mobile or zoiper for desktop softphones to turn the device into an extension to make and receive calls. Or if you already have a VOIP phone you can configure that to use on our network too.
VoIP users each get an individual extension number, and can call each other free just by calling their extension number. This allows you to call between devices like a laptop and a mobile phone free of charge.
VoIP users are added via your customer portal and are charged at £4 per month and include a bundle of 100 minutes of outbound calls.
Load More
Number Types
Memorable numbers are also known as Vanity, Gold, Platinum or Cherished numbers. Memorable numbers are phone numbers which have certain patterns within them giving them meaning or making them much more likely to be remembered.
If you are looking to get a memorable number for business or personal use, then you’ve come to the right place.
Our memorable numbers start at just £5 per month, with no minimum term contracts!
To find a memorable number, just choose your required area code, then click on the “Memorable numbers” Tab. You will then be presented with the available numbers for that area with the monthly costs next to them.
Some numbers are more memorable than others, which means that there is variable pricing for numbers categorised as memorable numbers.
For more information on our memorable numbers and to set one up today for free, view our Memorable Phone Numbers page
Yes – you can have as many numbers as you like and you can set how each number is routed. You can route numbers to different groups of users or extensions, or have every user answering all your calls. How you route your calls is completely up to you. It is completely configurable from your online account portal and you can update this as often as you like.
Yes, you can have as many telephone numbers as you need. Your first standard number with us is free and any additional numbers are chargeable. Additional numbers are added via your customer portal after you have created your account
Load More
Troubleshooting
Credit on your account will expire after a period of 360 days from the date of the purchase unless you add more credit in the meantime.
To avoid losing this credit balance simply top up before the credit expires and the entire balance will roll over for another 360 days.
We email a credit expiry reminder in advance of any credit expiring, giving you plenty of time to top up and keep your remaining balance.
If you are using the Auto Top Up facility then you can avoid credit expiring by manually setting the trigger limit below that of your current balance, which will force a credit top up.
If your credit balance does expire then any unused allowances will expire as specified.
Expired credit is non-refundable.
You can top up your account using any credit or debit card. You can also set up automatic top ups, which will add payment to your account if your account balance falls below a certain level. This is all set up online by yourself.
The unlimited bundle is activated against a VoIP user, and allows that user unlimited outbound calls to standard UK landlines and mobiles plus many international destinations. This bundle costs £7 per month on top of the £4 per month cost of the VoIP user.
Unlimited outbound calling is added via the customer portal once you have activated and verified your account.
Terms and Conditions for the Unlimited Bundle can be found within the footer of our website.
An announcement is a media file which is played to the caller. This can be used as a call greeting eg “Thanks for calling Dave’s Auto repairs. Please hold the line whilst we connect your call”
They are a great tool to give your business a professional look and feel. You can personalise the announcement to say anything you like, this can be done by using our text to speech services, or by uploading your down media via the customer portal
If you are forwarding calls to a mobile number then you may experience ring delays. These are normally an issue related to the time that the mobile network takes to locate the handset across the mobile network via its local transmitter, and are part of the nature of mobile phone networks.
You will find that the time that it takes to connect to a mobile phone varies, depending on things like weather conditions, we infill this time with a “ring ring” tone, to avoid the gap that the caller would otherwise hear.
Whenever you answer calls via VoIP on your mobile device, you will notice that the connection/ ring time is much shorter.
We comply with European directives on the payment for goods and services in terms of electronic transactions.
When you make a top up credit payment, you have to check a box to say that you understand that payments are not reversed, and no payments are refunded.
Account credit pays for services in advance. This is a prepaid service.
If you do not agree with this policy then please do not use our prepaid services.
If you have accidentally deleted a number from your account, or if your number was removed from your account due to non use. There are 2 things that you need to be aware of-
1 – Your first standard telephone number is free, additional numbers are chargeable
2 – our systems will look for accounts with no numbers and suspend the account as part of the clean up routine that allows people to easily cancel an account by deleting the number.
If you were paying for your number either as an additional number or as a chargeable memorable number then your number may still be held in reserve on your account. If so, you will see it listed under your services section on the portal. If it does show then simply making a top up to your account will automatically renew the number.
If your number has been completely removed from your account, then you can try to add the number back to your account yourself via the customer portal. Just click on “my numbers” then click on “add new number”. You can then use the number selector to find the number and add it back to your account.
If you can not see the number then you can get in touch with us and we can check if the number is still available and add it back to your account. There may be an admin charge to reinstate the number for you.
If your account has been marked as cancelled then you can reactivate this by simply topping up the account. This will then allow you to add new users, numbers and system features.
If there is no number on the account then you will need to immediately add a new number under the NUMBERS section, or the account will not be live.
If you have any problems reactivating an old account then simply use our CHAT facility on our website.
If you are having problems calling out then please check the following-
1 – Firstly check the credit balance on your account by logging in, your balance is displayed at the top of the screen.
2 – Secondly use the rate checker on our PRICING page to check the rate of the call by typing in the telephone number including the country code.
3 – If the number you wish to call costs more than 50p per minute, or the balance that you have left, then the call will fail.
If you need any further help with calling out then please contact us using our chat facility, where we will be happy to help you.
If you have multiple accounts and wish to migrate phone numbers from one account to another then there is a charge for the time that it takes us to do this manually.
£10 – move a single virtual number from one account to another
To initiate moving a number between accounts please raise a support ticket by clicking on SUPPORT and selecting the appropriate option.
If inbound calls to into your VoIP system are not being connected or if a message from us is played then please firstly try the following before submitting a ticket –
(1) Check your VoIP Users are active/registered VOIP/SIP USERS
If you are receiving calls to your VoIP users then please check the following-
– If using a mobile device, make sure that your VoIP app is displaying as REGISTERED. If not then switch it off and back on again.
- Ensure that your VoIP/SIP users are added into your call/ ring group for that number.
- If you are using other voip hardware then try rebooting the devices and also the routers and switches on the network.
– If you have an external destination phone number (landline or mobile number) in the call forwarding group, make sure you have credit on your account as a low balance will prevent the call from completing – If you don’t need the external divert number, just delete leaving only the VoIP users in the group
(2) LOW BALANCE
If you have an external member in your call group, such as a landline or mobile telephone number, you will need to keep your account in credit. This is because the system will see that the call may potentially be answered by the external group member and therefore a credit balance is required to be able to forward the call. In this case please simply top up your account and try again after a minute.
(3) Check your services
Under the service section of your portal please ensure that all your services are active on the account, you will need to check that the numbers, VoIP users and call / ring groups are all active. If anything needs renewing then simply top and and any overdue services will automatically renew.
Our rate checker allows you to easily check the cost of any call globally, so use this if you want to check the cost of calling outbound, or forwarding a call to a destination.
When entering a destination number into the rate checker, this will not only display the call cost to this destination, but if this destination is included in any of our call bundles.
To use our global rate checker simply visit our PRICING page.
We hate to see you go, but if you wish to close your account then simply follow these steps.
1 – Log in to the portal
2 – Click on NUMBERS
3 – Click on your virtual number
4 – Click on CANCEL NUMBER
When an account has no numbers on it our systems will automatically set the status of the account to cancelled. This will set your account to cancelled, but allow you to log back in at a future date in order to retrieve invoices etc, or reactivate the account for future use.
If you wish to shred your account completely, or if you are having problems cancelling your account then please raise a support ticket and use the cancel account option.
If you have attempted to register for a free account with us and have had a registration error then this may be because of one of the following reasons-
1 – Sometimes our systems receive such high volumes of registrations that they become overloaded, so it is worth trying again in a couple of minutes to see if the same issue occurs.
2 – Temporary/ghost email address – if you are registering using a temporary/ghost email address service then these are banned and we automatically reject these submissions.
3 – You already have an account – you can only register an email address against one account, so if you try and use the same email address more than once then this will be rejected – if you wish to close the original account in order to re-use the email address on a new account then simply click on SUPPORT and request that the account is shredded first.
If you are still having issues with account registration then please contact us using the CHAT facility on our website or click on SUPPORT and select to create a new account, and we will process this manually for you.
To maintain our very low costs we need to automate our processes, including payments.
We accept credit or debit card payments via our 3rd party card providers. This is a self service system that links to our portal and allows you to top up whenever you need more account credit.
The criteria for card payments is as follows-
Cards payment requirements
1 – registered 3D secure
2 – accept liability shifting from the donor bank
Card rejection reasons
1 – insufficient funds
2 – “Do Not Honor” rejection from the bank
3 – non 3D secured card
4 – non liability shifted rejection from the bank
5 – hard decline from the bank such as fraud
Card rejection actions
Anti-fraud checks
If our automated system find actions like multiple failed payment attempts, fraud rejections or similar, then the systems will automatically do the following –
1 – suspend access to your account
2 – depending on the rejection, the systems may cancel your number pending investigation
3 – email you on your registered email address to ask you to contact customer services to discuss your account
In this case just follow the instructions and customer services will investigate your account.
We offer straightforward pricing, clearly display costs and don’t tie you into any long term contracts either.
Your first number with is is free, unless of course you choose a memorable number which starts from £5 per month. If you need any additional number these are charged at £1.50 per month.
You can add a new VoIP user to your account for just £4, this means that you receive calls for free and also have the ability to make outbound calls showing your Love VoIP phone number as your outbound caller ID. Each user has a bundle of 100 minutes to call outbound. Most people use this via a mobile app installed on their mobile phone, but it can also be used on a desktop device or with a SIP compatible physical phone.
You can also forward calls to landline and mobile numbers, practically anywhere in the world. Forwarding calls means that you do pay to receive the call as we have to forward the call out of our network. You can check the cost of forwarding a call via our rate checker on our website.
Your monthly costs also include a whole package of excellent phone system features, you can activate these anytime via our customer portal. We also have a small selection of advanced services such as larger storage space for call recording which do cost a little bit more – but you can see up to date costs for these on your customer portal and on our current pricing page of the website.
Please note: Calls made to an 0800 number will always incur an incoming call cost of 7.5p per minute plus any call forwarding charges if forwarding to an external group member.